Just as the school season gets underway, I'm preparing for the fall season. This paper pumpkin requires only twelve small strips of paper, two brads, and two leaf cut outs. Enjoy.
Friday, August 26, 2011
Pumpkin Papercraft
Just as the school season gets underway, I'm preparing for the fall season. This paper pumpkin requires only twelve small strips of paper, two brads, and two leaf cut outs. Enjoy.
Sunday, August 21, 2011
Mini origami candy box
Saturday, August 20, 2011
Simple Origami Butterfly
Just wanted to say that I am not the original author of this butterfly module; however, I wanted to show everyone how easy it is to create. This origami butterfly would look great sitting on top of a present instead of a traditional bow, or would add a touch of whimsy to the top of a wine bottle to be gifted to that special friend.
Thursday, August 18, 2011
It's Not a Tomato!
 Pincushions....they're not just a tomato anymore! With crafting on the rise of ultimate trendiness amongst people young and old, even the tools used to create the latest and greatest have a new look.
 I've embroidered a poppy by hand onto aida cloth, and backed it with purple felt as a stand alone pincushion; however, today, pincushions are being fashioned into wearable "hands-free" tools...as wristlets, as rings, and thereby taking an old favourite and revamping it to a new level of usefulness.
Tuesday, August 16, 2011
It's Hooterific!
 ....My plushie owl that is....just had to get that off my chest! :)
But really, I was getting a little bored framing my cross-stitch....aren't you? So by using a pattern that I found in a crafty magazine, I was inspired and delighted to make this plushie owl that I have since placed in my painted, origami cherry-blossom tree that my music students love.
I love little creatures...don't you?
Saturday, March 12, 2011
Victorian Inspired Home Decor

Wednesday, March 2, 2011
Functional AND Pretty Office Organization

Not only office organization....but HOME organization can be creative as well as functional. I decided to replace a functional but visually unappealing office organizer (for pens/pencils/notes), with a Victorian themed decoupaged coffee can that serves the very same purpose. I used special vintage themed gift wrap to decoupage onto the coffee can, and then I dry-brushed cream,brown, and turquoise colored paint on top of it to give it an aged look. I finished it off with a copper colored ribbon and accented it with satin cream roses. As a result, I have a counter-top organizer that adds a special touch to my kitchen.

Tuesday, March 1, 2011
Baby Dragon

3D Modular Origami - also known as "Golden Venture" can create some of the most amazing papercraft projects around! Following a GREAT tutorial from youtube's amazingorigami, I created my own baby dragon. I did make a slightly bigger version and went with a different wing pattern than what was shown; however, the tutorial was great, and best of all - my students love it. Follow this link to create your own!
http://www.youtube.com/watch?v=Sy1v4YHwE3M
Monday, February 21, 2011
Rosetta Pendant

Thursday, February 17, 2011
Michigan J. Frog!
Michigan J. Frog was my favourite Loonie Toons episode growing up as a kid, and today it continues to put a smile on my face every single time I think about ol' Michigan.....sooooo.......
Thanks to Jewellia7777 on youtube who created and awesome frog tutorial, I modified my frog slightly to resemble MY favourite Rag Time Frog...Here's to you Michigan!

Thanks to Jewellia7777 on youtube who created and awesome frog tutorial, I modified my frog slightly to resemble MY favourite Rag Time Frog...Here's to you Michigan!

Friday, February 11, 2011
You Are My Sunshine......
 Hey Teachers!
Mom's!
Wonder Women Extraordinaire!
You want a way to show off your little people in the best possible light? LoL....Then follow the link to learn how to make this two piece origami star by Mio Tsugawa. I've turned my little creation here into a picture frame to house my little gem....my son Lukie. So thanks to the author Mio Tsugawa, and to Origamiancy for an awesome tutorial. http://origamiancy.com/2010/10/2-piece-origami-star-traditional/
Monday, February 7, 2011
My Gothic Valentine.
 "Romanti-Goth" has a nice sound to it, don't you think? That dark Victorian/Gothic Vintage look appeals to me very much, and so, I created a necklace some time ago which represents a "darker", "dangerous" more seductive Valentine's Day.
To create something similar, work on "gun-metal" curb chain. Create three beaded cluster groups in whatever colour palette you choose - as long as you include black. The focal bead is a black stone heart surrounded by purple, lavender, and peach shades in varying colour shades and sizes. Add interesting findings into your piece. Add extra "spice" to your necklace with a chain extension that dangles off of your clasp a couple of inches and finish off with a co-ordinating glass bead. Enjoy!
Homemade Crayon Tips.

1. Make sure you use the same BRAND of crayons. If you mix different brands together, their varying ingredients creates different melting points. So you will have some crayons that are ready to pour, and some that just NEVER want to melt at all. Also, I have found that some brands of crayons have a creamier texture, and some have a more oily texture....so keep it in the same vein....so to speak.
2. Adding just a hint of cooking spray to your candy molds, not only makes them slip right out of their molds when cooled; but also adds a wee bit of sheen to your newly made crayons....makes them look EXTRA cool!
3. Mixing a whole bunch of different colours may LOOK cool to your final product; however, when the kids use it, they might be disappointed with the "muddy blend" when they start to color. By using different ranges of "red" for example....light, medium, dark, neon, of the same shade will create a palette of colours that they can actually use and be happy with - about how the colours are blending together.
4. Use the oven to melt the crayons. Microwaves have a tendancy to "boil" the product. By placing the crayons in individual tin foil tart shells will allow you to have better control over your batches. You can even "pinch" the side of the tart shell to create a "spout" which makes it easier to pour.
Hope this helps! Have fun!
Wednesday, February 2, 2011
Tuesday, January 25, 2011
Black-Work turned Chocolate Brown

Sunday, November 28, 2010
Friday, November 19, 2010
Wednesday, November 17, 2010
Defender of the Faith...or the Thread
It happens every single time....
I sit, get out my cross-stitch...
Make sure my tea is within my reach....
and then...
and then...
Pursie must sit right on top of my thread...
What is it with cats?
They're insane....
I sit, get out my cross-stitch...
Make sure my tea is within my reach....
and then...
and then...
Pursie must sit right on top of my thread...
What is it with cats?
They're insane....

Thursday, November 11, 2010
Monday, November 8, 2010
Tuesday, November 2, 2010

Friday, October 29, 2010
Floral Clay Jewellery Bowl

Wednesday, October 27, 2010
Fall and Winter Unite!

October 25th was the day to mark on the calendar - the arrival of our first snowfall here in Edmonton Alberta. Once again, experiencing more than one season at a time sets my creativity a blazin' with post Halloween thoughts of pre-Christmas craftin'! Somebody stop me!!!!! Wait...don't do that...I wouldn't like it...
...you wouldn't like to see me get angry...I might turn green.....
 Pursie...blinking in disbelief at the early arrival of Jack Frost...I say that it is far better for her to be on the inside looking out, than the other way around! :))
Saturday, October 23, 2010
We're Going "Victorian" This Year.
 Thats right...Victorian Christmas will be our theme this year, as I am truly inspired by the colour palette of Plums, Lavender, Ivory, Gold and Silver. I've started to create some of the decorations this year (you have to start early you know) with these lovely mini wreaths that will eventually adorn my tree.
How To Create Your Very Own Mini Wreath.
You will need:
Fimo Clay in varying colours. I chose White, Lavender, Purple, Burgundy, and Gold
Oven
Sealant
It's best to create this project on a wax lined cookie sheet right from the "get-go". You don't want to get all touchy-feely with it.
Using your white Fimo Clay first, create three long strings measuring ten inches long, and braid them loosely. Then form into a wreath shape. It's nice to have one of the strings skinnier than the rest, to give it an uneven yet natural look.
Then use your Lavender and Purple Fimo to create baby rosettes, which are just tiny little tubes loosely formed and gently press into the clay.
From there, use the Burgundy and Gold Fimo to create berries that surround the flowers.
Bake in the oven using the directions on the package. Do not overbake, and when the project is completed, let it cool on the cookie sheet. Hot Clay is extremely fragile, so resist the urge to pick it up. Once your wreath is completely cooled, apply a sealant to protect your wreath. Enjoy!
Tuesday, October 12, 2010
Matte Gold Victorian Clay Roses
 Fimo Clay is a wonderful medium to work with. With its range of muted colors, to bright, to their sparkly "effects" clay, there are many wonderful crafts to be created using this product.
Saturday, October 2, 2010
Another Project Complete

Now..time to break out the apple cider....yum!
Monday, September 27, 2010
A Witches Tale
 Tomorrow marks my first day of in-house decorating for Halloween...A tad early I know, and over the years I have been criticized for my early starts - but oh well!!! I love it, and I do what I love...period.
Thursday, September 23, 2010
Fall Felt Mandala's Batch 4
 The Night Sky Mandala with the "star-moon" theme and autumn leaves pays homage to my Mother, Barbara. On a crisp Fall evening, we would bundle up to go for evening walks in the small town where I grew up.
In that same small town during this time of year - came the Fair. Small, quaint and charming would be words to describe its atmosphere. For me, it was all about the senses...the smells, the sounds, the sights. Candy Apples and fresh Taffy were among my favourite foods during the course of an evening such as this.
Now, in my 30's, I've become a bit lazy in terms of costume for Halloween. I love handing out the candy to impatient children - wearing my Witches hat and black coat. I sit on my decorated porch, hot apple cider in hand, a warm smile, and ambient lighting emanating from old smoke laden jars illuminating the night sky...Sunday, September 19, 2010
Thursday, September 9, 2010
Fall Felt Mandala's Batch 3
 In honor of my friend Lumie, I made an owl mandala which represents the baby theme of her blog - A Hope Chest for Baby. Her Blog is filled with wishes, and dreams, and a bright future that is nourished by her own creativity.
The "Darkening Sunset" mandala represents my home on Young Street of Tillsonburg Ontario, where to this day, my father still lives there after 37 years, and the backyard there still holds a sense a wonder. Beyond the small little fruit orchard - lies the gully, where I swear the legend of Sleepy Hollow first originated! LoL...
The two Celtic mandala's represent Don and I. I will lay claim to the bejewelled cross, - whilst he can be the HARP....hehehehe...no pun intended...not at all! :))
Love you sweetheart!!!
Thursday, September 2, 2010
Continuation of Autumnal Mandala's

Sunday, August 29, 2010
HeartFELT Seasonal Memories.
 The first Mandala that I created was from an established pattern . It was the little bird wearing the witches hat. I made it because my husband calls me "Little Bird" without fail...so when I saw this, I simply followed the pattern...
But then I started to create autumnal mandala's that meant something to ME. Each holds a special memory or tradition of some sort. The next one that I will make will be my son's black Kinjitsu uniform with special Fall inspired features to embellish further on it. These are my first five mandala's....many more to come; however, it is my first autumnal project this year - on this chilly day in Edmonton Alberta.
Wednesday, August 25, 2010
Tuesday, August 24, 2010
Monday, August 23, 2010
Finding A Balance.
It's a weakness of mine...learning to balance my time between creating, posting on SEVERAL websites, working, and relaxing. That's just it...I don't think I relax in the traditional sense of the word anymore. My hands are always on the move; however, at times I find myself really sacked - as if I cannot shut off my ever flowing creative mind, and as a result...feeling drained - exhausted even as my feet hit the floor in the morning....this must change.
Funny thing is, my husband Don is EXACTLY the same....we create...we obsess...we talk excitedly about our newest projects...each of us cutting the other one off in mid-sentence to add something of import to the conversation. Life to us IS creating...as important as food and water is to our survival; however, we must find that balance...introduce a little "down-time" in our lives...shut down to replenish our creative mind and spirit.
Funny thing is, my husband Don is EXACTLY the same....we create...we obsess...we talk excitedly about our newest projects...each of us cutting the other one off in mid-sentence to add something of import to the conversation. Life to us IS creating...as important as food and water is to our survival; however, we must find that balance...introduce a little "down-time" in our lives...shut down to replenish our creative mind and spirit.
Thursday, August 19, 2010
Here's An Interesting Little Tim - Bit!
 I love Tim Hortons Coffee...don't we all? A large double-double to me ACTUALLY has the ability to save lives when encountering people on a day to day basis...
Tuesday, August 17, 2010
Igniting Imagination!

I'm a piano teacher, along with my husband Don
which makes for a pretty busy and often LOUD household throughout the day. While Don's studio takes on a more sophisticated look with the beautiful Heintzman Piano and soft tones of chocolate browns and beiges, my room appeals to the younger crowd - my main target audience! However, I wanted to instill MORE than just a love of music (while they pound on the keys in gleeful joy..) I wanted to ignite their imagination in many art mediums and found that a passion of music and art blends very well together. EVERY week like clockwork I add something new to the room, and the children enjoy looking for it...it's a great way to connect with my students while adding the love of music and art in its many wonderful forms together in one harmonious room. Now...it's back to our lesson!


Monday, August 16, 2010
Check Your Drawers!
Oops! Not those ones! :)
Every new project that I create, whether it be cross-stitch, jewellery design, or paper folding, I enhance them further with simple embellishments. Personalizing embroidered gifts by stitching their name or initials into the fabric really adds something special to the piece, and makes the receiver of that gift feel a little more special too. :)
 Vintage lace, buttons, bits of unused jewellery can be re-purposed for future projects. Bookmarks like the one I have just finished can be spruced up with lace...it's (sew) easy to attach too as the aida cloth allows for even stitches! I also created a very small Swarovski wreath (about the size of a large button) at the bottom of the bookmark. I made this one from topaz coloured Swarovski crystals and cream coloured seed beeds. So don't delay! Check your drawers today!...And tell me what you find. :)
Saturday, August 14, 2010
A Primitive Way To Tell A Story

Thursday, August 12, 2010
It's Fall To Me.
Even though it's August, my mind is already in that "Fall Routine" Mode. What does "Fall Routine" mean to me? It means cooler nights, shorter days, back to school for my music students, better focus for me all the way around because there is simply better structure or routine in my life during this time of year. I've always felt like I was "floating" around during the summer...which I detest...but now I am coming alive again creatively and spriritually as well...I think there is something about the changing colors of the trees, and the cool fresh air on my face that wakes me up, and revvs my engine!
Monday, May 31, 2010
Making Life Easier
I'd thought I would share this little tidbit of information regarding my embroidery work. By placing a large silk pillow on my lap while I'm embroidering keeps my work clean, and helps relieve the weight of the project by having to rest it higher - closer to wear my hands are at. It also minimizes hand fatigue, and even serves as a large pin cushion when needed. The smoothness of the silk prevents my threads from fuzzing up, and best of all, I find that my posture is better as I am not leaning over my work.
Monday, May 24, 2010
The Completed "Eleanor"

Finally, she is done, and she is beautiful with soft muted tones, and an elegance all her own. No wonder that it comes from a series of Elegant Ladies created by John Clayton. There are quite a few of these ladies just ready to be stitched, and they all have that "something special" about them. Great care has been taken to the subtleties of skin tone, hair coloring, and dress. I plan on making quite a few of these in the years to come.
Monday, April 19, 2010
Victory Dance
 I always do a little "victory dance" after completing an embroidered project because it can be so darn time consuming which I guess is part of the reason why I like it. You have to be dedicated and spend many hours creating something that will hopefully stand the test of time to be passed down from generation to generation...
Anyways....my peacock is done...kudos goes of course to Dimensions Gold for creating a fantastic pattern....so today, my present to myself was to buy the frame, and now it hangs proudly in my home.....

I love the colours in this one....very "happy" little picture. :)
Saturday, April 3, 2010
Well....I have been posting....
It's funny...I just posted new pics on my blogger here last night; however because they are on one of my extra "pages", it apparently doesn't count as a post....so I will show you what I have been up to. I have been working on a few 3D origami projects lately. I love this particular craft because you can make so many lovely things...all with tiny pieces of paper....just take a look...:) and happy Easter everyone...


Thursday, March 25, 2010
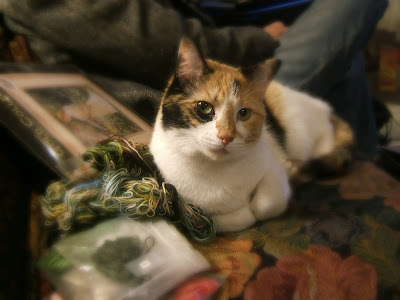
Calico Craze....

She's just the best....my Purrsie! Lots of love and
affection, and now I'm excited to find a calico cross
stitch pattern that reminds me of her.

I love Cross-stitch....I love my Calico, and so I must combine the two to maximize the cutesness factor in my house....so now I'm on the hunt to find an awesome calico pattern that is a zany as she is....Here's a few pics of the furry beast. :)
Tuesday, March 23, 2010
Stitchery Loves Company
 ....And what kind of company does stitchery love? Why TEA of course! Loose leaf tea is another passion of mine...I love the whole ritual of making it, and then, after adding a bit of honey to my favourite darjeeling tea, I sit down in my comfy chair and stitch after a long hard day's work.
This is my favourite cup too!
Love Tea!
Love it!
Love it....................Yum!
Monday, March 22, 2010
It Doesn't Have to be Big to Count.

Even the smallest embroidery project can mean a lot to someone because it is made especially with THEM in mind. Anyone can spend a few minutes at home decor shop, and find something that would suit the tastes of the person receiving the gift; however, investing a little time, and effort and love into an embroidered gift will mean so much more - especially because they put a little of themselves into it.
 This bookmark is being made at present using "Linen" floss. I love this thread because its matte, rustic look appeals to me. There are "slubs" in the thread which add to the character of the floss.
Saturday, March 20, 2010
The Fellowship...

As I grow older, I find it harder to find true friends who share my interests. Of course, it was much easier when I was in school; but at that age, we were still discovering who exactly we were. It's only now, in my thirties, that I find myself deeply rooted, and wanting a kinship with like minded people. That's the main reason for this blog really...
A couple of years ago, I found such a friend on "myspace"...Luminea Meredith - a kind gentle soul who was my age, creating all manner of things handmade. She derives satisfaction from her creations as I do, and is always looking for that next project. She fills her home with such creations, and inspires others to do the same.
 She makes Spa baskets, filled with her loving care - embroidered pillows, embroidered robes, breakfasts trays with embroidered coasters, and candles adorned with ribbon. Indeed she puts her heart and soul into her creations, which makes them not only "custom", but priceless to the people who receive them.
 Embroidered Pillows, and cross-stitch hangings adorn her walls. She keeps her house feeling fresh by switching out her home decor as the seasons change with her delightful and meaningful creations.
Friday, March 19, 2010
Catching the Easter Bunny!
 Soon, Easter will be upon us...as a child, visions of this huge brown floppy-eared bunny rabbit hiding chocolate eggs around the house drove me to heights of pure jubilation. My brother and I would race around the house, each with a bowl in hand trying to find the most chocolate. We were a blur...we were a whirling dervish! We were like the Tasmanian Devil we watched on T.V every Saturday morning!
My Dad would call to me "I see the easter bunny! Hurry Hurry!" I would race to the window, looking feverishly down the street...only to here my father say..."Ohhhhhh,,,,you just missed him...."
Love you Dad.
Wednesday, March 17, 2010
In the Series of Ladies...

Here's the second lady that I am working on which is part of the same series. She's almost done, and I will post the final picture upon completion. Again, great detail to her costume, skin tones, and all round shading.

Tuesday, March 16, 2010
One of a Series

Wow...here's one I actually finished! :) It's one of a series of ladies adorning period clothing. So far I have three of these patterns, and am looking to purchase the whole series down the road someday to create a collage. I love these patterns because the shading and tonal values in the final product is simply soft and stunning...quite an elegant series actually.

Subscribe to:
Posts (Atom)